Joplin is a professional note-taking app, but it has no built-in templates to create notes. However, you can create our own templates and use them later. You can even share those templates with others.
This guide will show you how to create templates in Joplin and then use them later.
Video
The video shows how to create templates in Joplin. The does not not cover the sharing part. For that, you will need to read the section.
Install template plugin
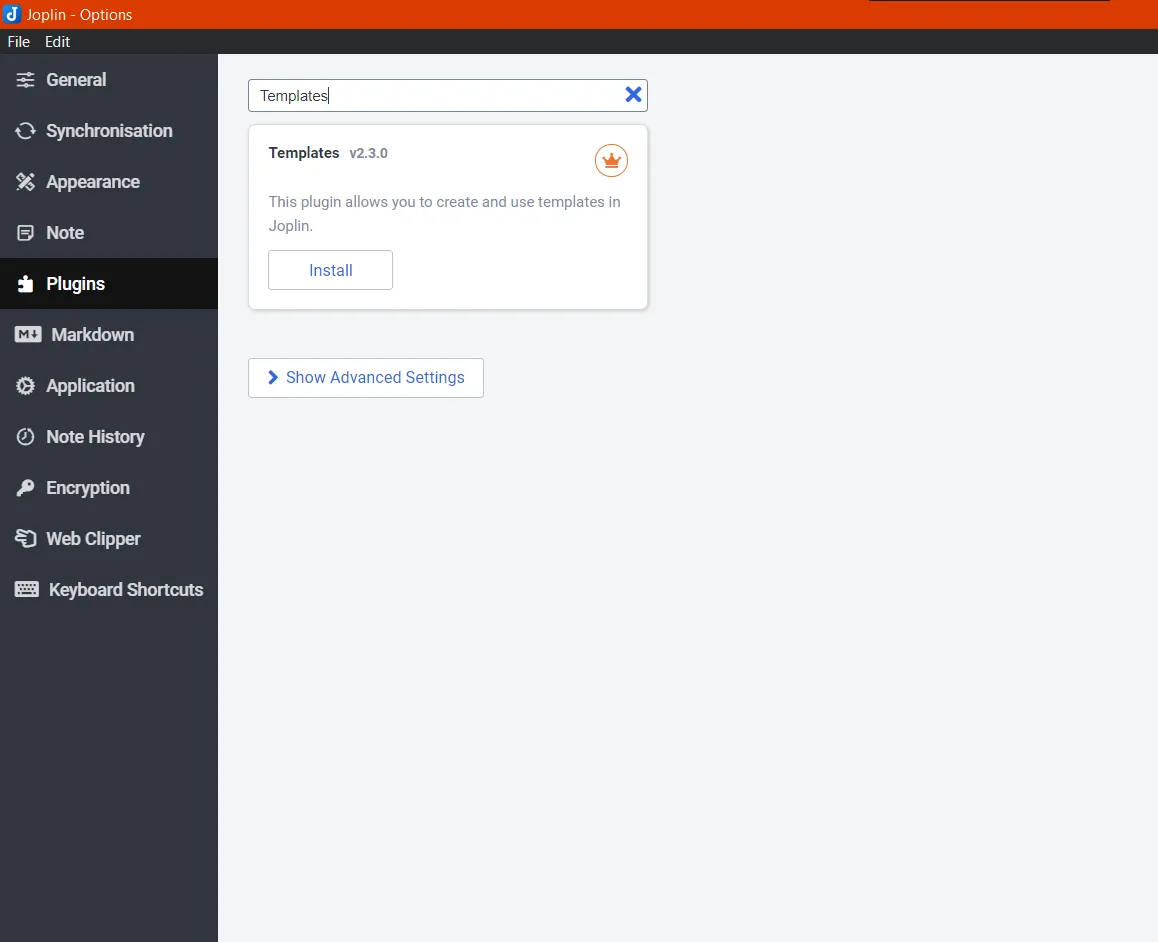
The first step is installing the “Templates” plugin in Joplin. This plugin allows us to turn notes into templates. It also unlocks several other features related to template creation and usage. Follow these steps to install it:
- Click “Tools” in the top menu, and then click “Options” in the dropdown.
- Select “Plugins” from the left menu and search for “template.”
- Then install the “Template” plugin and restart the Joplin app.
Create Joplin templates
There are two methods to make notes and to-dos recognizable as templates. The first is to add a “template” tag to the notes, and the second is to transfer the notes to a new notebook titled “Templates.” Let’s see each one below.
Creating a template from a note
To create a template, follow the below steps:
- Click on “Tools” and then “Options”
- Select “Templates” from the menu on the left
- Choose the “Tag” option from the dropdown
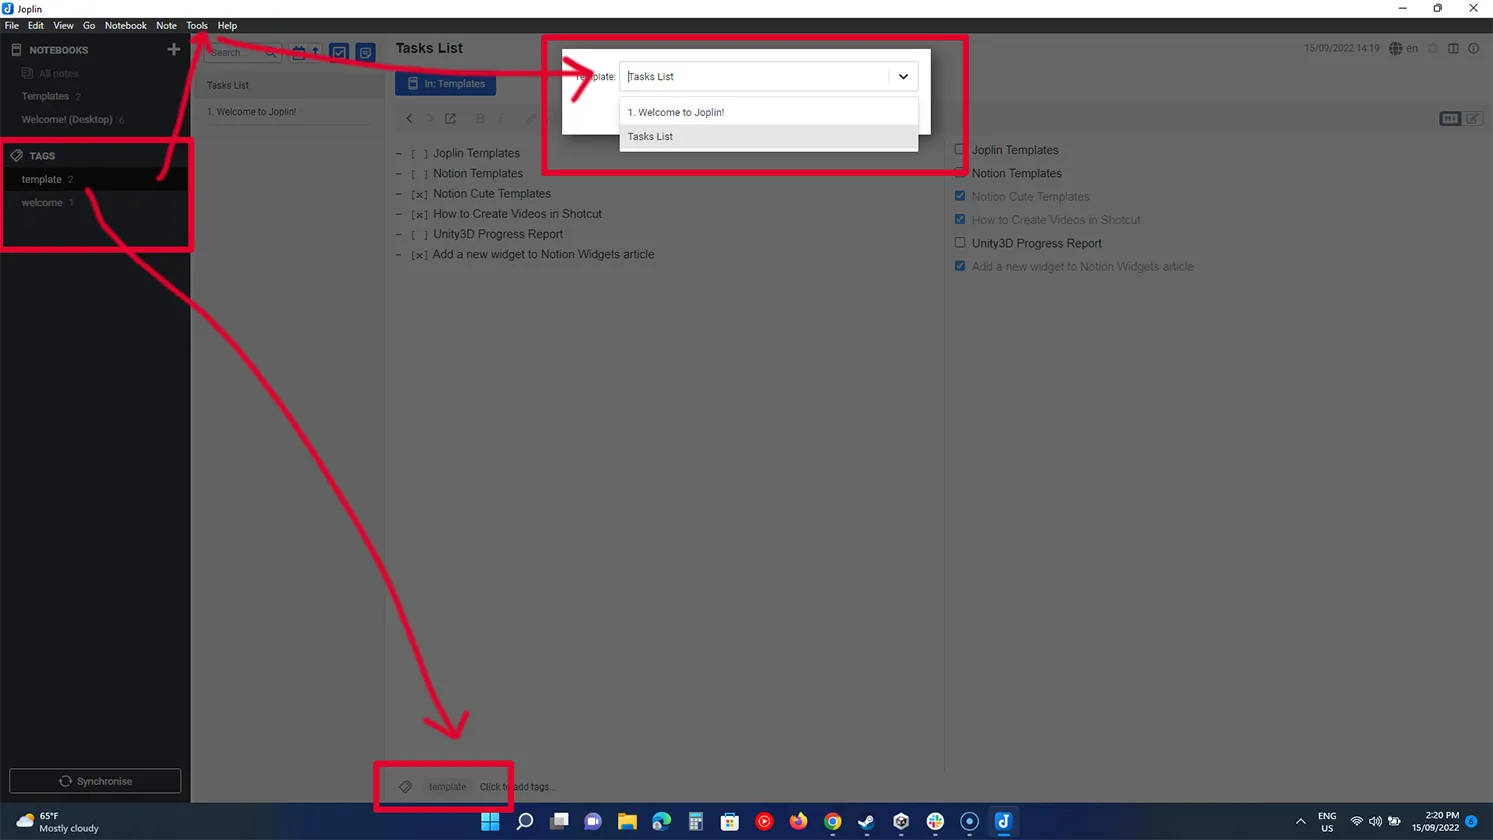
With the tag method, you need to click on the tag option “Click to add tags” at the bottom of the note that you want to clone as a template.
Add the tag “template.” Yes, the tag name must be “template” without the dot. This note can be used as a template now.
Creating notes from the created template
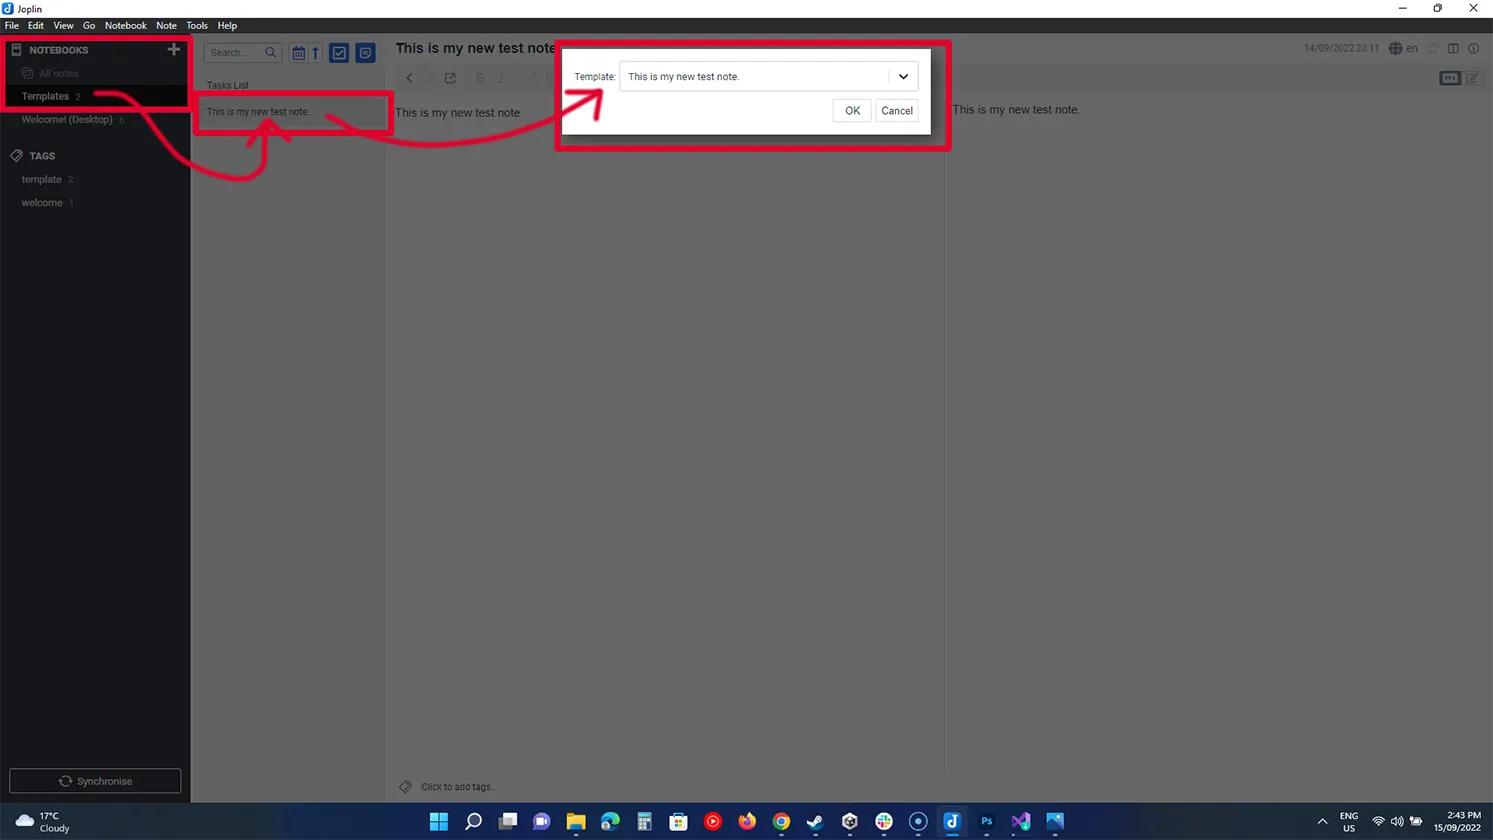
If you want to create a note from one of the templates, follow the steps:
- Click on “Options”
- Hover to “Templates”
- Select the first option, “Create note from a template”
The app will show all the notes with the tag “template.” Select the one you want to create. The new note should be created instantly.
Creating Joplin templates using Notebook
The method is similar, but instead of using tags, you create a Notebook titled “Templates.” All the notes in that folder will be considered templates.
Follow the step to enable this option:
- Click on “Tools” and select “Options”
- Select “Templates” from the menu
- Select the “Notebook” option
Creating a template from a Notebook
To create a template, click on the plus sign next to notebooks to add a notebook. Give it the name “Templates.” Click on the notebook if not selected, and click on the new note button.
The new note created inside the “Templates” notebook can be used as a template.
Creating notes from the created template
The steps for creating a note from templates are the same as in the tag method. Click on “Options” and hover to “Templates.”
Click on the first option to see all the notes in the “Templates” notebook. Click on the one you want to create.
Related: Joplin vs. Evernote
Set default note templates
After creating a template, Joplin allows you to make it the default. A default note template can be imported directly into notebooks using a shortcut.
You can only make one note and one to-do default template. Here are steps to set a default template:
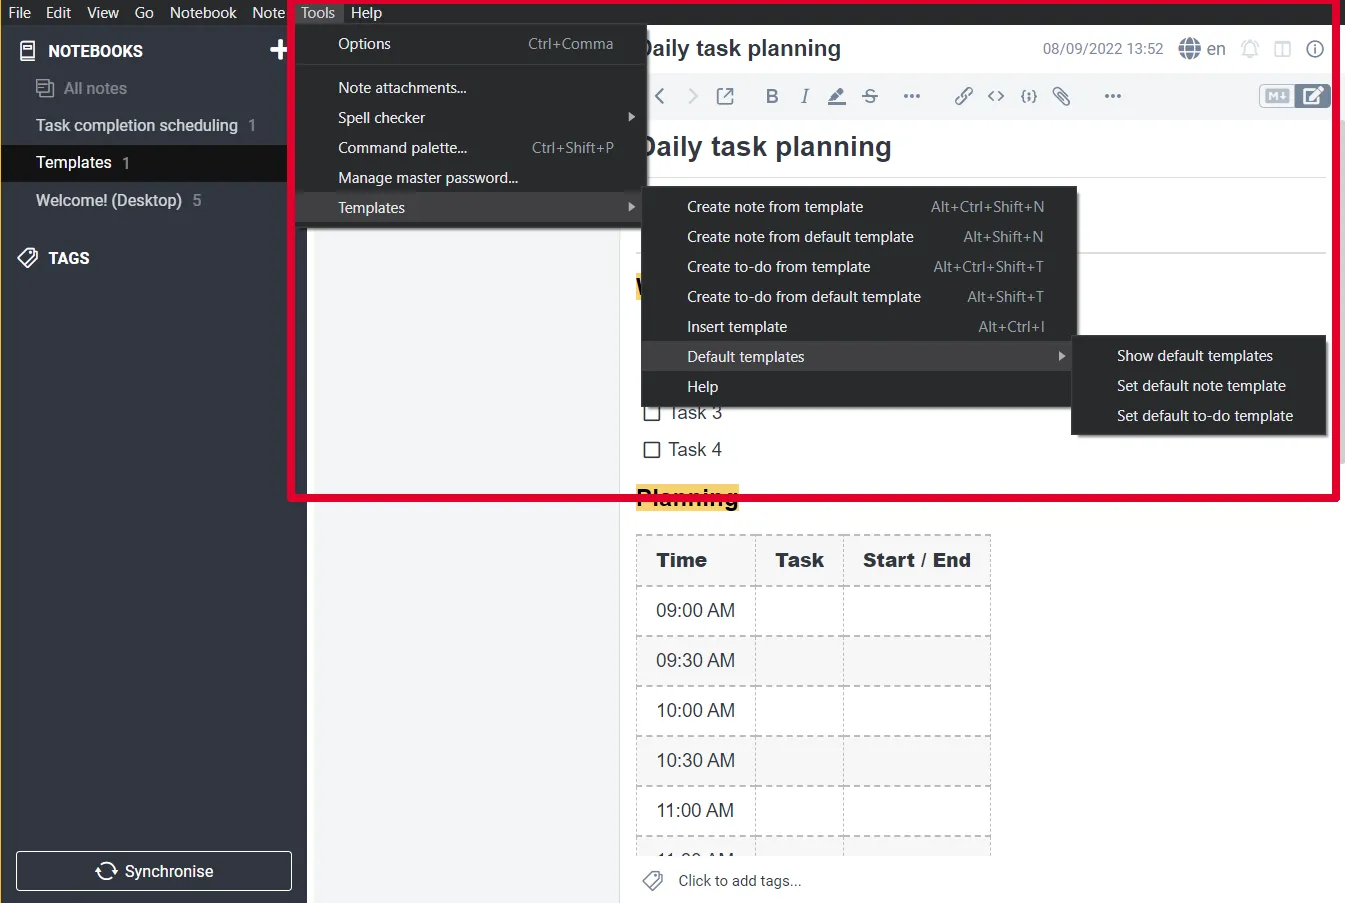
- Go to Tools > Templates > Default templates
- Click “Set default note template” to set the default note template
- Click “Set default to-do template” to set the default to-do template
- From the dialog box, select any template and click “OK”
To use it, open any notebook:
- Press “Alt + Shift + N” to import the note template
- Press “Alt + Shift + T” to import the to-do template
Sharing templates with others
Sharing templates is possible, but only in the Notebook way. Joplin allows exporting notebooks, so if you already have a notebook titled “Templates”, you can right click on that notebook and export it as the Joplin Export File (JEX).
Others who have Joplin can import the file by going to File –> Import –> Joplin Export File, and follow the process in the above section to create notes.
Variables and templates
The concept of variables is difficult, but they have great power, forcing users to use them. Variables are dynamic values that can be changed in real-time.
Note: Read more on the Variables plugin page. If you are new to Joplin, I suggest sticking with templates for now.
A variable contains some data, and wherever you use that variable shows that data. But, the cool thing about variables is that changing a variable’s information changes the values in all locations.
In Joplin, we can use system or user input variables to control dates, titles, project status, etc.
The Joplin template plugin lets us use different variables while creating templates in markdown format.
There are three types of variables: built-in, custom, and special. The description and usage of each one are described below.
Built-in variables
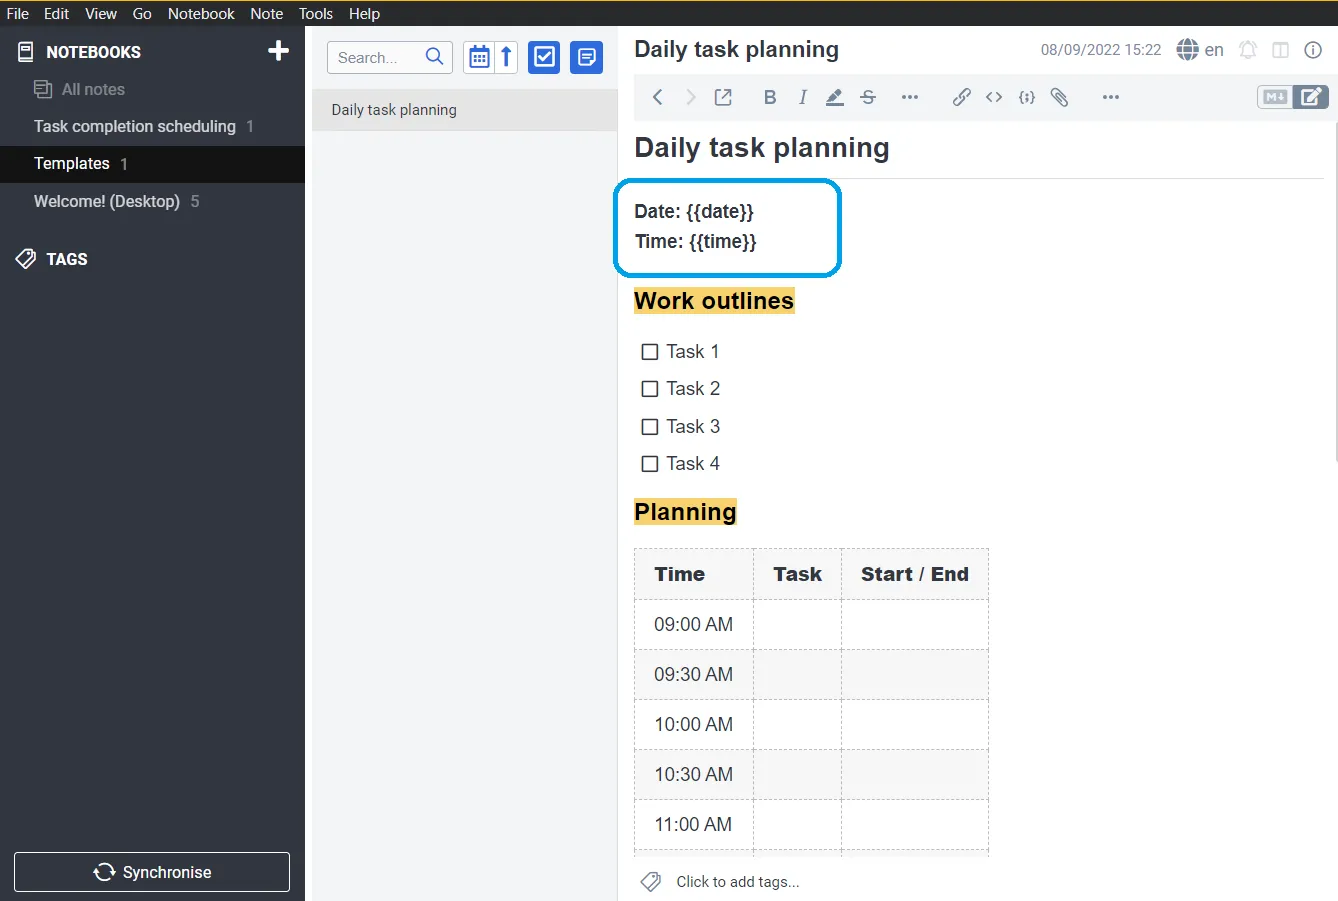
The built-in variables are updated automatically and are related to date and time. You can insert them into a template by enclosing the variable name in double curly brackets, for example, {{variable_name}}.
The value of these variables will be modified to the most recent date and time whenever you use the template. Here are the six built-in variables in Joplin:
| Variable name | Usage |
|---|---|
| {{time}} | Insert updated time |
| {{date}} | Current date |
| {{#custom_datetime}} | Customized date and time based on the supplied string |
| {{bows}} | Date of the first day of the week (beginning on Sunday) |
| {{datetime}} | Updated date and time |
| {{bowm}} | Date of the first day of the week (beginning on Monday) |
Custom variables
Joplin also supports adding custom variables that make the template behavior dynamic. These variables get their value from the user.
When you use a template with custom variables, a dialog box shows up where you can give each variable a specific value.
Based on your input, the template will be populated with appropriate values. Below is an example of using a custom variable in the template:
—
Project_name: text
Total_tasks: number
Submission_date: date
Importance: dropdown (low, medium, high)
—
The {{ Project_name }} project has {{Total_tasks}} tasks. The last submission date is {{Submission_date}}.
Importance: {{Importance}}
We can configure variables to accept different types of inputs. The following input types are supported:
- Text
- Number
- Boolean
- Date
- Time
- Dropdown
Related: Joplin vs. Obsidian
Special variables

The special variables let us dynamically add a title and tags to the template. The value of these variables can be a combination of other built-in and custom variables.
The template plugin provides the following three special variables:
| Name | Usage |
|---|---|
| template_title | Create a title for the template |
| template_tags | Insert tags in the template |
| template_notebook | *Give the ID of any notebook to this variable. |
* This way, when a note is created using this template, it will be automatically stored in the specified notebook.
Here’s an example of how to use special variables:
—
template_title: Meeting discussion held on – {{datetime}}
template_tags: meeting – {{date}}
—
{{template_title}}
{{template_tags}}
The following points were discussed in the {{template_title}}
Conclusion
Joplin does not come with templates, but this guide should help you create templates in Joplin and use them later.
In addition, variables make templates more interactive. With variables, the notes’ title, tags, and content can be changed on the runtime.
Madhsudhan Khemchandani has a bachelor’s degree in Software Engineering (Honours). He has been writing articles on apps and software for over five years. He has also made over 200 videos on his YouTube channel. Read more about him on the about page.